Map Your Activation Milestones From Signup to First Paid Moment
Define 3–5 measurable activation milestones that reliably predict conversion, then align your onboarding guidance, messaging, and instrumentation to help users reach each milestone faster.

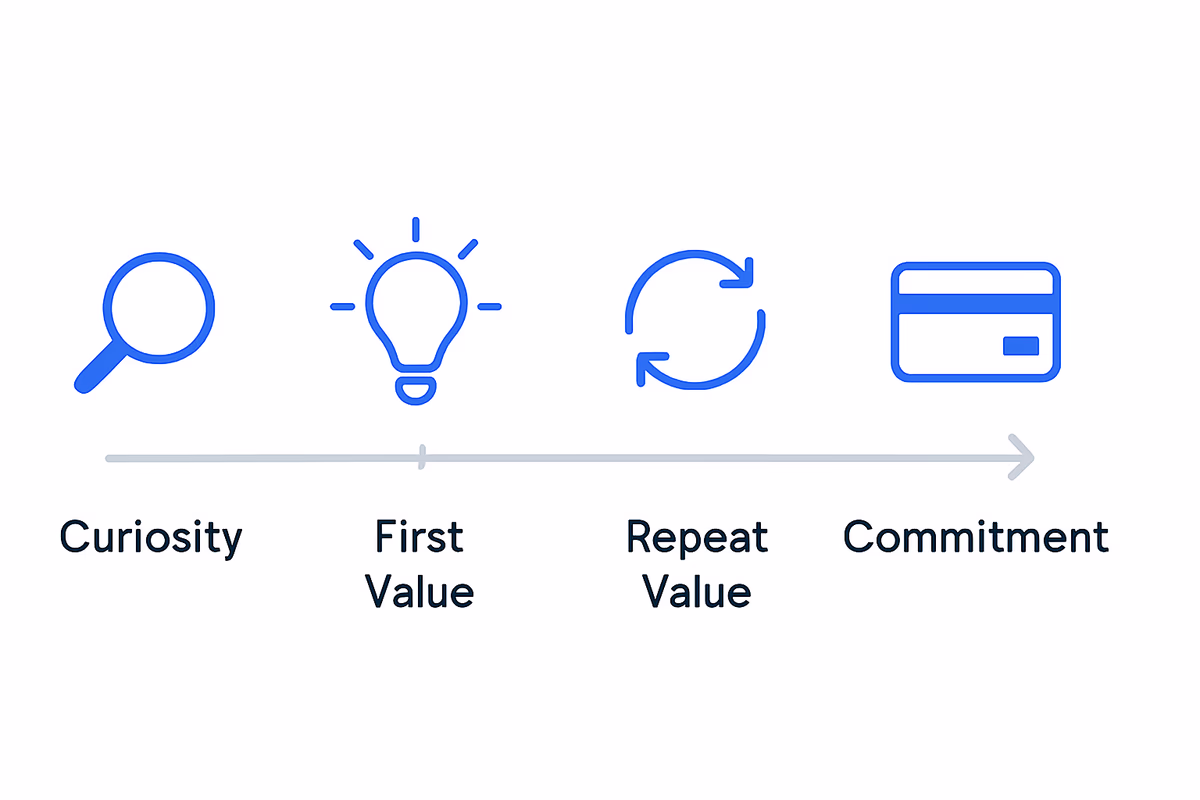
Activation isn’t a single event. It’s a sequence of small “proof points” that tell you a user is progressing from curiosity to value to commitment.
If you can map that sequence into 3–5 measurable milestones, you get three advantages:
- You can predict conversion earlier (before the trial ends).
- You can diagnose where users stall (and why).
- You can align onboarding guidance to the exact step a user is missing.
This article gives you a practical method to define your activation milestones from signup to the first paid moment, then build onboarding guidance around them.
What an activation milestone is (and isn’t)
An activation milestone is a measurable behavior that indicates the user has moved closer to experiencing repeatable value and is more likely to convert.
A good milestone has four traits:
- Behavioral: based on actions, not pageviews.
- Specific: unambiguous definition (who did what, how many times, within what time).
- Predictive: strongly correlated with conversion, not just “activity.”
- Actionable: you can influence it with onboarding, UX, or lifecycle messaging.
A weak milestone looks like:
- “Visited dashboard”
- “Spent 5 minutes in the app”
- “Clicked around”
A strong milestone looks like:
- “Connected a data source”
- “Invited 1 teammate”
- “Created 1 project and completed 1 key workflow”
Step 1: Define the “first paid moment” and work backward
Start with a clear definition of the outcome you’re optimizing for.
Choose one paid outcome
Pick the earliest revenue-confirming event that matters for your model:
- Self-serve: trial → paid upgrade completed
- Sales-assisted: qualified handoff (e.g., “requested demo after completing setup”) or contract signed
- Usage-based: first billable usage threshold reached
Write it as an event:
Subscription StartedorPlan Upgraded- Include plan, price, and billing period as properties
Identify the minimum value story that leads to payment
Ask: what must be true for a user to feel confident paying?
Common “must be true” statements:
- “I can see my data in the product.”
- “I can complete the core workflow end-to-end.”
- “My team can collaborate here.”
- “I can share/export something to stakeholders.”
These statements become candidates for milestones.
Step 2: List your candidate milestone behaviors (10–20 items)
Create a raw list before you narrow it down. Pull from:
- Product analytics: top events among converters
- Session replays: where people hesitate
- Sales/CS notes: what users need before buying
- Support tickets: recurring setup blockers
Common milestone categories (use as prompts)
- Setup: connect integration, import data, configure workspace
- Aha moment: complete core action, see result, generate output
- Habit formation: repeat core action, return within 24–72 hours
- Collaboration: invite teammates, assign tasks, share output
- Proof of ROI: report created, automation enabled, time saved visible
At this stage, don’t worry about the count—capture everything.
Step 3: Turn candidates into 3–5 milestones using a scoring system
You want a short sequence you can operationalize. Use a simple scoring model to pick the best milestones.
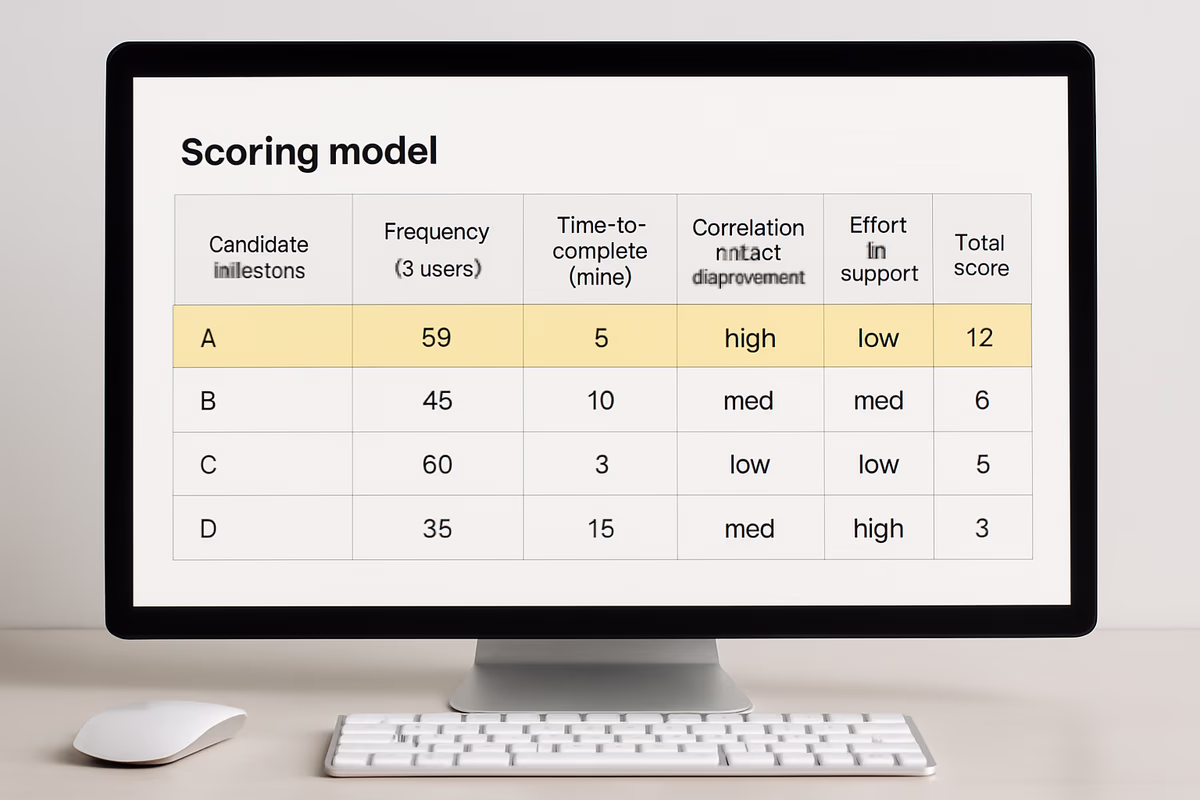
Score each candidate 1–5 on four dimensions
- Predictiveness: how strongly it correlates with conversion
- Proximity: how close it is to the paid moment (later milestones often predict better)
- Controllability: how much onboarding/UX can influence it
- Clarity: how easy it is to define and track correctly
Add the scores. Your top 3–5 are your milestone shortlist.
Practical rule of thumb for milestone count
- 3 milestones if your product is simple and time-to-value is short.
- 4–5 milestones if your product needs setup, collaboration, or multiple roles.
Step 4: Write milestone definitions that analytics won’t misinterpret
Milestones fail in practice because definitions are fuzzy.
Use this template:
- Milestone name
- Event(s) that qualify
- Threshold (count, properties)
- Time window (e.g., within 1 day of signup)
- Segment scope (persona, plan, acquisition channel)
Example milestone definitions (generic)
M1: Workspace created
- Event:
Workspace Created - Time window: within 30 minutes of signup
M2: Data connected
- Event:
Integration Connected - Property: integration_type in {X, Y, Z}
- Time window: within 24 hours
M3: Core workflow completed
- Events:
Project CreatedANDFirst Output Generated - Threshold: 1 completed workflow
- Time window: within 3 days
M4: Collaboration activated
- Event:
Team Invite Sent - Threshold: 1+ invites accepted
- Time window: within 7 days
M5: Upgrade intent shown (optional)
- Event:
Pricing ViewedORUpgrade Clicked - Threshold: 2+ times in 7 days
Not every product needs M5, but it can help you trigger the right prompts.
Step 5: Validate milestones against conversion (don’t trust intuition)
Now test whether your milestones actually predict payment.
The quick validation approach
For each milestone, compare:
- Conversion rate for users who reached the milestone
- Conversion rate for users who did not reach it
Also measure:
- Median time from signup → milestone
- Drop-off rate between milestones (M1→M2, M2→M3, etc.)
What “good” looks like
You’re looking for milestones that create a meaningful lift. For example:
- Users who reach M3 convert 3–10x more than those who don’t.
- The time-to-milestone is short enough that you can influence it during trial.
If a milestone doesn’t change conversion odds, it’s probably just “activity,” not progress.
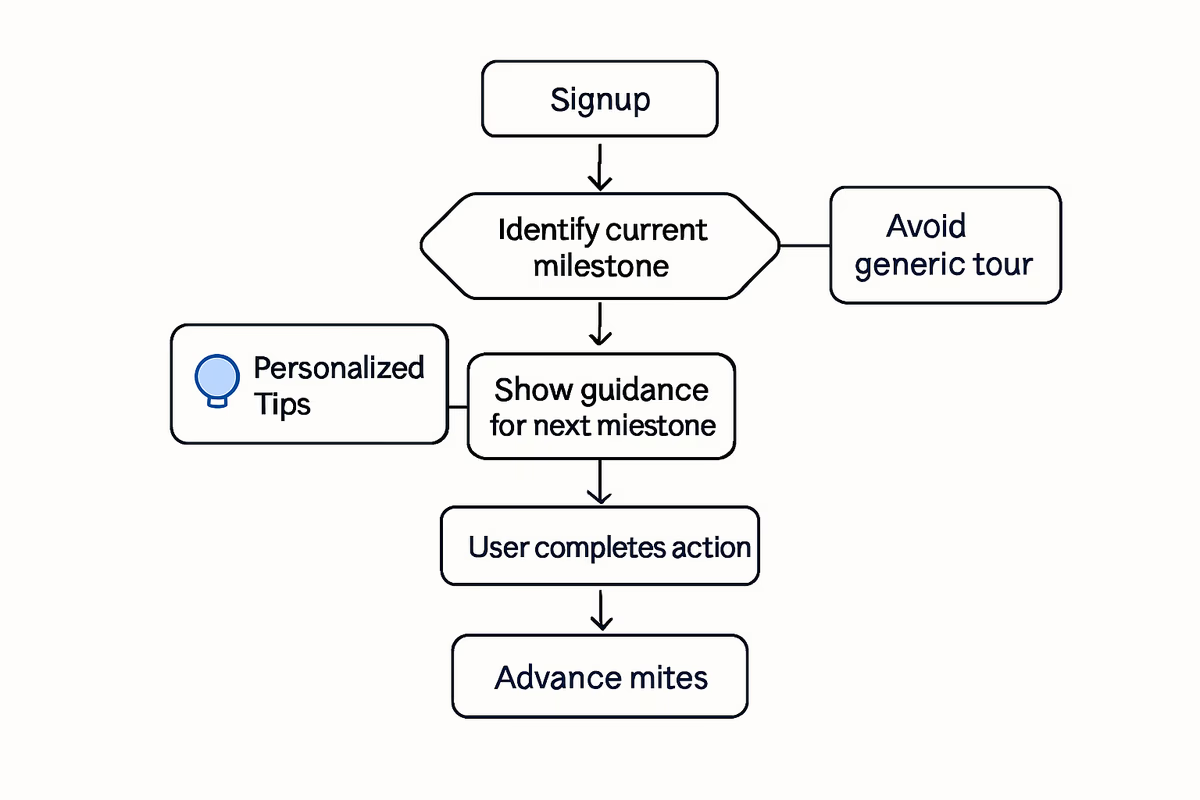
Step 6: Align onboarding guidance to each milestone (one job at a time)
Once milestones are defined, onboarding becomes simpler: each user should see guidance that helps them reach the next milestone, not a generic tour.
Build a milestone-based onboarding map
For each milestone, document:
- The user’s likely question at that step
- The top 1–3 blockers
- The smallest set of actions to complete it
- The best in-app pattern to use
Recommended guidance patterns by milestone type
Setup milestones (M1–M2)
- Use: checklists, step-by-step flows, integration prompts
- Goal: remove uncertainty and reduce setup time
Aha milestones (M2–M3)
- Use: interactive walkthroughs, contextual tooltips, templates
- Goal: get to a tangible output fast (report, dashboard, automation, shipped item)
Collaboration milestones (M4)
- Use: role-based prompts (“Invite your teammate to review”), share modals, nudges
- Goal: make multi-user value obvious, not optional
Upgrade milestones (near paid)
- Use: paywall messaging tied to value, upgrade prompts triggered by usage
- Goal: connect pricing to outcomes already achieved
Keep guidance conditional
Trigger onboarding based on state:
- If user hasn’t hit M2 in 24 hours, show an integration helper.
- If user hit M2 but not M3, highlight the next workflow step.
- If user hit M3 twice, prompt collaboration or advanced features.
This prevents over-onboarding and keeps the product feeling responsive.
Step 7: Instrument the funnel so you can actually manage it
Milestones are only useful if you can measure and act on them.
Minimum tracking you need
- Signup event with source/UTM
- Each milestone event with relevant properties
- Upgrade/paid event
- User and account identifiers (B2B needs account-level views)
Build three operational views
- Milestone funnel: signup → M1 → M2 → M3 → paid
- Time-to-value dashboard: median time to each milestone by segment
- Drop-off diagnosis: top friction points between steps (with qualitative notes)
Step 8: Use milestones to drive experiments (and avoid random onboarding tweaks)
Milestones give you a clean experimentation framework.
A simple experiment backlog structure
For each milestone, write:
- Hypothesis: “If we reduce integration friction, more users will reach M2 within 24 hours.”
- Change: new template, guided setup, default configuration
- Success metric: M2 completion rate and time-to-M2
- Guardrails: activation quality (M3 rate), support tickets, churn
Prioritize by impact on the next step
Work on the milestone with:
- Highest volume of users stuck
- Highest conversion lift when completed
- Lowest effort to improve
This is how you move the whole funnel, not just polish UI.
Example: A 4-milestone activation map you can copy
Use this as a starting point and adapt the behaviors.
- M1: Account setup completed
- Workspace created + primary use case selected
- M2: Key input connected
- Integration connected or data imported
- M3: First value artifact created
- Core workflow completed and output generated
- M4: Value shared or repeated
- Shared with teammate/stakeholder or repeated core action within 72 hours
If you can get most users to M3 quickly, M4 becomes your “stickiness” bridge to paid.
Common pitfalls (and how to avoid them)
Pitfall 1: Picking milestones that are just feature clicks
Fix: tie milestones to outcomes (output generated, workflow completed, collaboration achieved).
Pitfall 2: Too many milestones
Fix: cap at 3–5. Everything else becomes supporting steps inside a checklist.
Pitfall 3: One-size-fits-all milestones for multiple personas
Fix: define milestone variants by persona (e.g., Admin vs Contributor) and measure separately.
Pitfall 4: Milestones that can be “faked”
Fix: add quality thresholds (e.g., “imported 50+ rows,” “created 3+ items,” “invite accepted”).
What to do next
- Write your paid moment event definition.
- Brainstorm 10–20 candidate behaviors.
- Score and select your top 3–5 milestones.
- Validate against conversion and time-to-value.
- Build milestone-based onboarding guidance that only pushes the next step.
When your onboarding is mapped to milestones, you stop guessing and start managing activation like a system: measurable, diagnosable, and improvable.
FAQ
How many activation milestones should my SaaS have?
Aim for 3–5. Fewer than 3 is usually too vague to diagnose drop-offs, and more than 5 becomes hard to operationalize. Use 3 for simple products with fast time-to-value, and 4–5 for products with setup, integrations, or multi-user collaboration.
How do I know if a milestone actually predicts conversion?
Compare conversion rates for users who reach the milestone vs those who don’t, and measure the lift. Also check time-to-milestone and drop-off between milestones. Keep milestones that show meaningful conversion lift and occur early enough that onboarding can influence them.
Should milestones be user-level or account-level in B2B?
Track both, but manage activation primarily at the account level for B2B. Many “activation” steps (integration setup, inviting teammates, sharing outputs) are account outcomes, even if initiated by one user.
What if different personas activate in different ways?
Create milestone variants by persona (e.g., Admin: integration connected; End user: first workflow completed). Measure each path separately and trigger onboarding guidance based on role, job-to-be-done, and current milestone state.
Table of Contents
- What an activation milestone is (and isn’t)
- Step 1: Define the “first paid moment” and work backward
- Choose one paid outcome
- Identify the minimum value story that leads to payment
- Step 2: List your candidate milestone behaviors (10–20 items)
- Common milestone categories (use as prompts)
- Step 3: Turn candidates into 3–5 milestones using a scoring system
- Score each candidate 1–5 on four dimensions
- Practical rule of thumb for milestone count
- Step 4: Write milestone definitions that analytics won’t misinterpret
- Example milestone definitions (generic)
- Step 5: Validate milestones against conversion (don’t trust intuition)
- The quick validation approach
- What “good” looks like
- Step 6: Align onboarding guidance to each milestone (one job at a time)
- Build a milestone-based onboarding map
- Recommended guidance patterns by milestone type
- Keep guidance conditional
- Step 7: Instrument the funnel so you can actually manage it
- Minimum tracking you need
- Build three operational views
- Step 8: Use milestones to drive experiments (and avoid random onboarding tweaks)
- A simple experiment backlog structure
- Prioritize by impact on the next step
- Example: A 4-milestone activation map you can copy
- Common pitfalls (and how to avoid them)
- Pitfall 1: Picking milestones that are just feature clicks
- Pitfall 2: Too many milestones
- Pitfall 3: One-size-fits-all milestones for multiple personas
- Pitfall 4: Milestones that can be “faked”
- What to do next